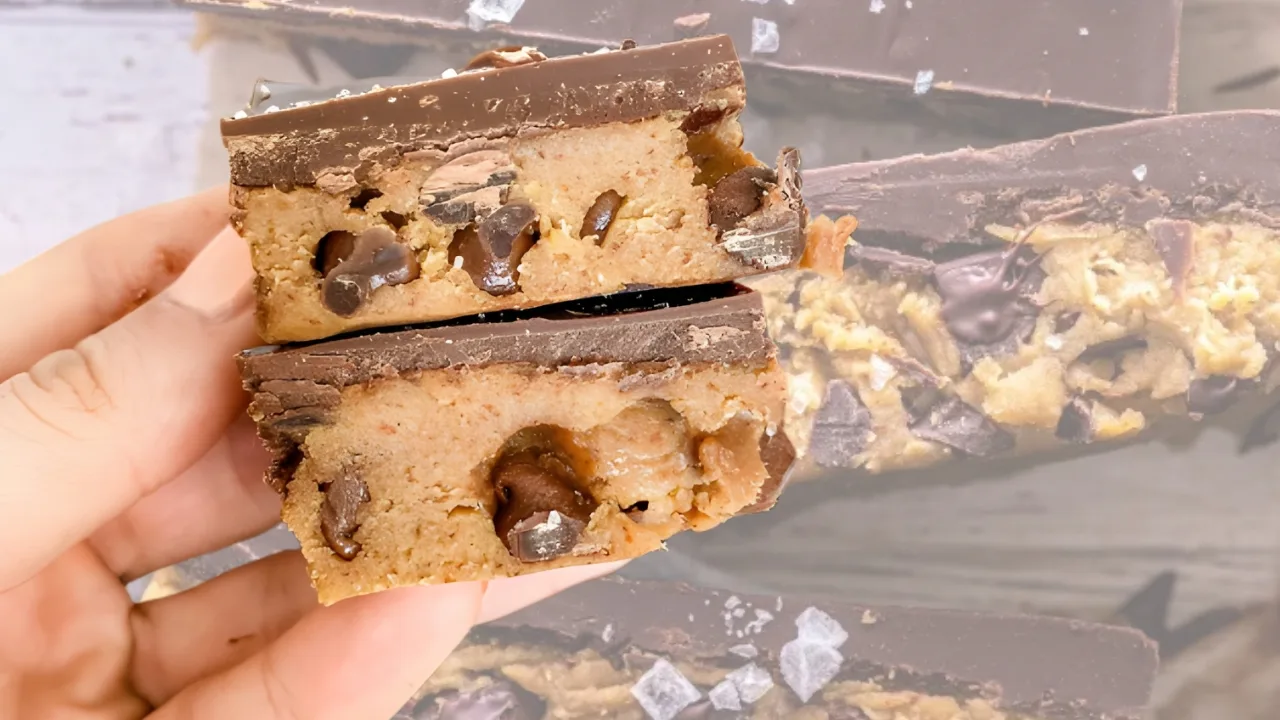
Imagine a dessert that tastes just like classic cookie dough but is secretly made from chickpeas and other wholesome ingredients. These High-Protein Cookie Dough Bars deliver that perfect combination of creamy, chewy, and sweet—without the guilt.
Made with chickpeas, peanut butter, vanilla protein powder, and dark chocolate chips, these bars are naturally gluten-free, dairy-free, and loaded with protein and fiber. They satisfy your sweet tooth while nourishing your body with real food.
You’d never guess they’re made from beans—trust us, they taste like the real thing! Nutritionist Rachel Lane says, “Chickpeas are an amazing source of plant-based protein. When paired with nut butter and protein powder, they transform into a high-protein dessert that actually fuels your body.”
These bars are perfect for post-workout recovery, healthy snacking, or as a nutritious dessert alternative.
Why You’ll Love These Cookie Dough Bars?
- High in protein and fiber – keeps you full and satisfied longer.
- Tastes like real cookie dough – smooth, creamy, and studded with chocolate chips.
- No refined sugar or flour – sweetened naturally with maple syrup.
- No baking required – quick and easy to make in under 20 minutes.
- Freezer-friendly – store and enjoy any time.
- Kid-approved and vegan-friendly – everyone will love them.
Ingredients
| Ingredient | Quantity | Notes |
|---|---|---|
| Cooked chickpeas (rinsed and drained) | 1 can (15 oz) | Remove skins for smoother texture |
| Natural peanut butter or almond butter | ½ cup | Adds creaminess and healthy fats |
| Vanilla protein powder | ¼ cup | Adds protein and flavor |
| Maple syrup or honey | 3 tbsp | Natural sweetener |
| Oat flour | ¼ cup | For texture and binding |
| Vanilla extract | 1 tsp | For that cookie dough flavor |
| Sea salt | ¼ tsp | Enhances flavor |
| Dark chocolate chips | ¼–⅓ cup | Mini chips work best |
| Milk or water | 1–2 tbsp | Optional, to adjust texture |
Step-by-Step Instructions
Step 1: Prepare the Chickpeas
Drain and rinse the chickpeas thoroughly. For the smoothest dough texture, peel off the outer skins by rubbing them between paper towels. This step is optional but makes a big difference in texture.
Step 2: Blend the Base
In a food processor, combine the chickpeas, peanut butter, maple syrup, vanilla extract, and salt. Blend until smooth and creamy, scraping down the sides as needed.
Step 3: Add Dry Ingredients
Add protein powder and oat flour. Pulse again until the dough forms a thick, sticky consistency. If it’s too dry, add 1 tablespoon of milk or water at a time until it blends easily.
Step 4: Fold in Chocolate Chips
Remove the blade and stir in chocolate chips with a spatula. Reserve a few to sprinkle on top.
Step 5: Shape into Bars
Line an 8×8-inch pan with parchment paper. Press the dough evenly into the pan, smoothing the top with a spatula. Sprinkle extra chocolate chips and lightly press them in.
Step 6: Chill and Slice
Refrigerate for 1–2 hours until firm. Slice into 8–10 bars or squares. Keep refrigerated for best texture.
Pro Tip: For a firmer, chewy texture, freeze the bars for 30 minutes before slicing.
Nutrition Facts (Per Bar, Approximate)
| Nutrient | Amount |
|---|---|
| Calories | 180–200 |
| Protein | 10–12 g |
| Fat | 8–9 g |
| Carbohydrates | 18–20 g |
| Fiber | 4–5 g |
| Sugar | 7–9 g (natural) |
These bars offer the perfect balance of macronutrients—ideal for post-workout recovery or a mid-afternoon energy boost.
According to fitness dietitian Dr. Amanda Foster, “Combining legumes like chickpeas with protein powder creates a complete amino acid profile. It’s an excellent way to get more protein from plant-based sources.”
Flavor Variations
| Flavor | Add-Ins | Notes |
|---|---|---|
| Peanut Butter Chocolate Chip | Use peanut butter + dark chocolate chips | Classic combination |
| Almond Coconut | Use almond butter + 2 tbsp shredded coconut | Tropical twist |
| Mocha Chip | Add 1 tsp instant coffee + chocolate protein powder | For coffee lovers |
| Pumpkin Spice | Add 2 tbsp pumpkin puree + pumpkin pie spice | Perfect fall snack |
| Mint Chocolate | Add ¼ tsp peppermint extract + cocoa powder | Refreshing and indulgent |
Each variation transforms the base dough into a new flavor profile while maintaining its creamy, cookie-like texture.
Tips for the Best Results
- Use a good food processor. It ensures smooth blending without chunks of chickpeas.
- Peel chickpeas. It takes a few minutes but creates a silky dough.
- Don’t over-blend chocolate chips. Add them after the dough is formed.
- Adjust sweetness. Taste the dough and add more maple syrup if needed.
- Store chilled. Keeps texture firm and flavor balanced.
Chef and nutrition coach Ben Martin advises, “Blending chickpeas with nut butter creates a smooth, rich texture that rivals any dessert—but with protein and fiber instead of processed sugar.”
Why Chickpeas Work in Dessert Recipes?
Chickpeas might sound like an odd ingredient for cookie dough, but they work perfectly because of their:
- Creamy texture when blended.
- Mild flavor that pairs easily with nut butter and vanilla.
- High protein and fiber content, making them a healthy base.
- Nutrient density – packed with folate, iron, and magnesium.
When mixed with peanut butter and protein powder, chickpeas form a smooth dough that tastes just like traditional cookie dough—without the raw eggs or processed flour.
Storage and Shelf Life
| Storage Method | Duration | Notes |
|---|---|---|
| Refrigerator | Up to 7 days | Keep covered in an airtight container |
| Freezer | Up to 3 months | Wrap individually for grab-and-go snacks |
| Room Temperature | Up to 24 hours | Not recommended for long storage due to nut butter |
For best freshness, keep bars chilled and bring to room temperature before eating.
Benefits of High-Protein Cookie Dough Bars
- Protein-Packed Energy: Supports muscle recovery and helps curb hunger.
- Fiber-Rich: Chickpeas and oats promote digestion and fullness.
- Healthy Fats: Nut butter provides sustained energy.
- Natural Sweetness: Maple syrup and dark chocolate chips give sweetness without refined sugar.
- Convenience: Quick, no-bake recipe for any time of the day.
“Protein-based desserts like this one prove that eating healthy doesn’t mean giving up your favorite treats,” says holistic nutritionist Tara Wells.
Cost Comparison – Homemade vs. Store-Bought Protein Bars
| Type | Average Cost per Bar | Protein (per bar) | Ingredients |
|---|---|---|---|
| Store-Bought Protein Bar | $2.50–$3.00 | 10–15 g | Often includes preservatives and added sugar |
| Homemade Cookie Dough Bar | $0.80–$1.00 | 10–12 g | Whole, natural, plant-based ingredients |
Homemade bars save money, avoid preservatives, and let you customize flavors and nutrition levels.
Troubleshooting Common Issues
- Too dry: Add more peanut butter or a splash of milk.
- Too sticky: Mix in a little more oat flour or protein powder.
- Grainy texture: Blend longer or peel chickpeas before blending.
- Not sweet enough: Add an extra tablespoon of maple syrup or a few stevia drops.
Step-by-Step Summary Table
| Step | Task | Time |
|---|---|---|
| 1 | Rinse and peel chickpeas | 3 min |
| 2 | Blend chickpeas, nut butter, and sweetener | 5 min |
| 3 | Add protein powder and oat flour | 2 min |
| 4 | Mix in chocolate chips | 1 min |
| 5 | Press into pan and chill | 1–2 hours |
- Prep time: 10 minutes
- Chill time: 60–90 minutes
- Makes: 8–10 bars
All to Know!
These High-Protein Cookie Dough Bars with Chickpeas and Chocolate Chips are the perfect blend of indulgence and nutrition. With creamy chickpeas, nut butter, and protein powder, they deliver a dessert-like flavor and texture without refined sugar or processed ingredients.
They’re ideal for athletes, busy professionals, or anyone craving a guilt-free sweet treat that supports their health goals. You’ll love how simple and versatile they are—no baking required, just blend, press, and chill.
As Chef Lucy Anderson puts it, “Healthy desserts don’t need to be boring. When whole foods meet creativity, the results are pure deliciousness—and these bars prove it.”
FAQs
Do these bars really taste like cookie dough?
Yes! The combination of chickpeas, peanut butter, and vanilla gives the same flavor and texture as cookie dough.
Can I make them vegan?
Yes. Use maple syrup and a plant-based protein powder.
Do they need to be refrigerated?
Yes, refrigeration helps maintain their texture and freshness.
Can I bake them instead?
They’re designed as a no-bake recipe, but you can bake them at 350°F (175°C) for 10–12 minutes for a cookie-like texture.